|
|
954RR Brow Light Mod Page 4 | |
|
|
I'd like to take credit for coming up with this mod, but I'm just not that clever. I got the idea and some directions off the forums at the Honda Sportbike Network, where I believe credit has to go to 1sic954rr for being the first to do it there, and to YakSpout for the relay wiring post. Also credit has to go to HondalGal over at FireBlades.org, I believe she was the first one to do it over there. Like I said, I don't come up with this stuff, but I do plagiarize very well, just ask my high school English teacher ;-)Just a quick disclaimer... I make no guarantee, warrantee, or promise that you won't royally screw up you bike by following these instructions. If you drill through your headlight, sorry but I'm not going to buy you a new one. Take your time, measure before you cut/drill and use common sense and you SHOULD be ok, but like I said I'm not promising anything. Hell, I don't even know what I'm talking about most of the time!You'll notice that I have pics from two different bike, one is mine the other is my brothers. This is my first tutorial of any kind so I didn't get all the pics I needed the first time around (or the second either for that matter) OK, on to the fun... | |||
|
| ||||
Wiring it up | ||||
| OK, now you need to decide how you
want to use your new brow lights. I use mine as running lights and
turn signals, so I use a relay to be able to use single filament bulbs (or
LEDs in my case) as both. If you only want them to be signals or
running lights then no relay is needed.
Now a word about heat. When I first did this I wired it up so that my flush mounts and brow lights worked as running lights and turn signals. The problem I had was the amount of heat the bulbs in the flush mounts created when used as running lights. After about 10 minutes they got hot enough to melt their housings, and then ended up looking like some kind of modern art at the end of the day. They didn't cause any faring damage, but after removing them I think I was lucky. If you decide to wire up your lights this way make sure the signal housing can take the heat, or switch the bulbs to a lower wattage or better yet to some high intensity LEDs. I did try some 194 bulbs in the brow light position, but they too got awful hot, so I just got some LEDs, they had the extra benefit of being brighter as well. I have since decided to use the flush mounts as only turn signals and the brows as turn signal/running lights. | ||||
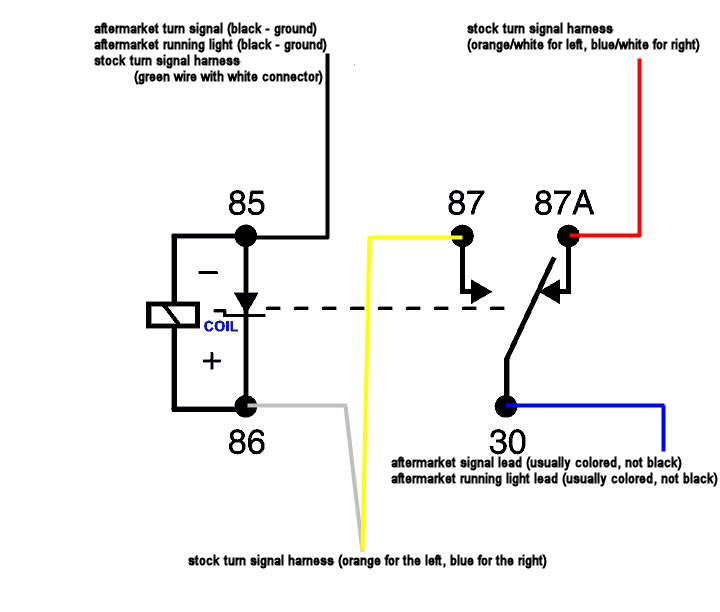
Brow and side marker lights as running lights and turn signals. | ||||
|
|
For this you will need the relays I listed on page one of this tutorial. You
don't need to get the wiring harnesses if you don't want to, but them make
things a little easier, so I got them. I also took the stock turn
signals apart and removed the wiring from them so I could use the stock
connectors, and not have to hack up the wiring harness on the bike.
I did leave enough on the stock signals that I could reverse the
procedure, but I doubt I ever will.
OK, lets get to wiring. I put a diagram together that should help out, but this won't be all the hard. (this needs to done to both sides of course) Connect the after market turn signal, brow light grounds (usually black) and the green wire from the stock turn signal harness to the black wire of the relay harness (terminal 85 on the relay) Connect the orange (left) or blue (right) turn signal lead (the one removed from the stock turn signal), the white wire from the relay harness (terminal 86, gray on the diagram), and the yellow wire from the harness (terminal 87) Connect the aftermarket turn signal and brow light leads (usually a color other then black) to the blue wire on the relay harness (terminal 30) Connect orange/white stripe (left) or blue/white stripe (right) running light lead form the stock turn signal harness to the red wire from the relay harness (terminal 87a) | |||
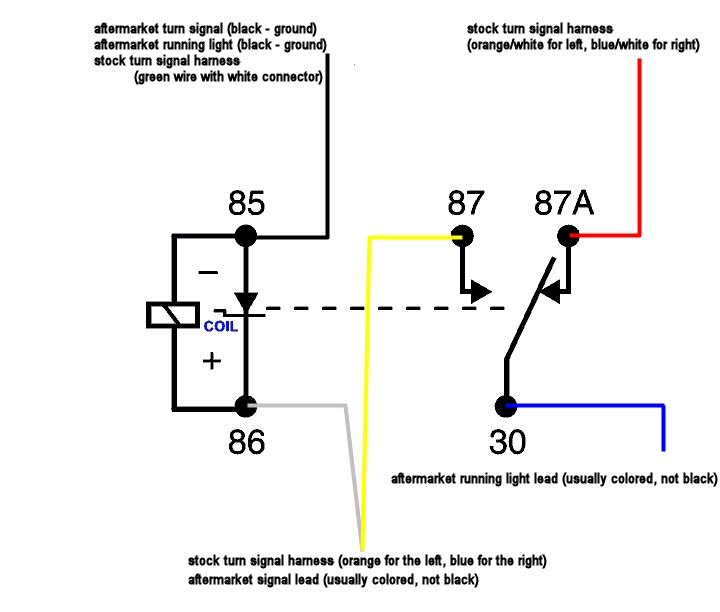
Brow lights as running lights and turn signals, side markers as only turn signals. | ||||
|
|
Again you will need the relays I listed on page one of this tutorial. You
don't need to get the wiring harnesses if you don't want to, but them make
things a little easier, so I got them. I also took the stock turn
signals apart and removed the wiring from them so I could use the stock
connectors, and not have to hack up the wiring harness on the bike.
I did leave enough on the stock signals that I could reverse the
procedure, but I doubt I ever will.
Basically you will just be switching the aftermarket turn signal wire from terminal 30 to terminal 87 form the above layout. Take a look at the diagram, and wire it all up. (this needs to done to both sides of course) Connect the after market turn signal, brow light grounds (usually black) and the green wire from the stock turn signal harness to the black wire of the relay harness (terminal 85 on the relay) Connect the orange (left) or blue (right) turn signal lead (the one removed from the stock turn signal), the white wire from the relay harness (terminal 86, gray on the diagram), the aftermarket turn signal lead (usually a color other then black) and the yellow wire from the harness (terminal 87) Connect the aftermarket brow light lead (usually a color other then black) to the blue wire on the relay harness (terminal 30) Connect orange/white stripe (left) or blue/white stripe (right) running light lead form the stock turn signal harness to the red wire from the relay harness (terminal 87a) | |||
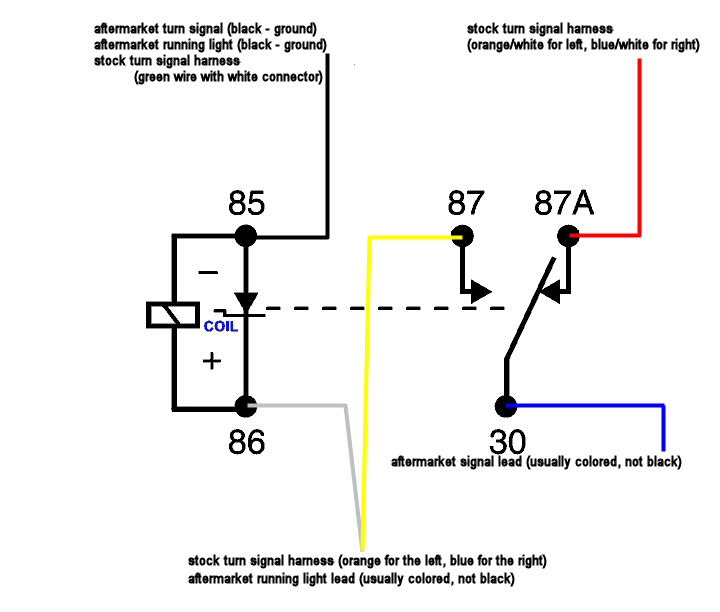
Side markers as running lights and turn signals, brow lights as only turn signals. | ||||
|
|
You will need the relays I listed on page one of this tutorial if you have
single filament turn signals. If you have dual
filament turn signals then just wire them up according to their
instructions, and tap into the turn signal (orange or blue) and ground
(green) leads for the brow lights. Just use some wire taps.
Basically you will just be switching the brow light wire from terminal 30 to terminal 87 form the above layout. Take a look at the diagram, and wire it all up. (this needs to done to both sides of course) Connect the after market turn signal, brow light grounds (usually black) and the green wire from the stock turn signal harness to the black wire of the relay harness (terminal 85 on the relay) Connect the orange (left) or blue (right) turn signal lead (the one removed from the stock turn signal), the white wire from the relay harness (terminal 86, gray on the diagram), the brow light lead (usually a color other then black) and the yellow wire from the harness (terminal 87) Connect the aftermarket turn signal lead (usually a color other then black) to the blue wire on the relay harness (terminal 30) Connect orange/white stripe (left) or blue/white stripe (right) running light lead form the stock turn signal harness to the red wire from the relay harness (terminal 87a) | |||
Side markers as turn signals, brow lights as running lights. | ||||
| No relays needed. Just wire the
turn signal leads to either the orange or blue wire (depending on side) on
the stock connector, and the ground to the green lead on the stock
connector. Wire the brow light power lead to white wire on the
stock connector at the headlight and the brow light ground to the the green lead on the
stock turn signal connector. This needs to be done because by design
power to the running lights is disabled when you activate the turn signals.
If you connect you brow running lights to the bike running light power they
will go out when you activate you turn signals. Wiring them to the
headlight power makes sure they will be on whenever the bike is running.
You could also connect them to the battery, but you should use a fuse if you
do that.
| ||||
Side markers and brow lights as turn signals. | ||||
| No relays needed. Just wire the turn signal and brow light leads to either the orange or blue wire (depending on side) on the stock connector, and the ground wires to the green lead on the stock connector. Make sure to cap of the orange/white and blue/white wires. | ||||
| Go to page five to finish up! | ||||
This site was last updated 06/07/04